Every WordQuest Setting Explained
When I first opened the settings panel in WordQuest, I was pleasantly surprised by how much control parents actually have. Most educational apps give you a toggle or two and call it a day. WordQuest lets you customize the experience to match your child's confidence and how they like to interact with games. Here's what every setting does, and some recommendations based on what's worked for our family. (If you haven't created a child profile yet, our five-minute setup guide is the right starting point — come back here once they've played a level or two.)
To access settings, go to Child Profiles and tap the gear icon on your child's profile card.
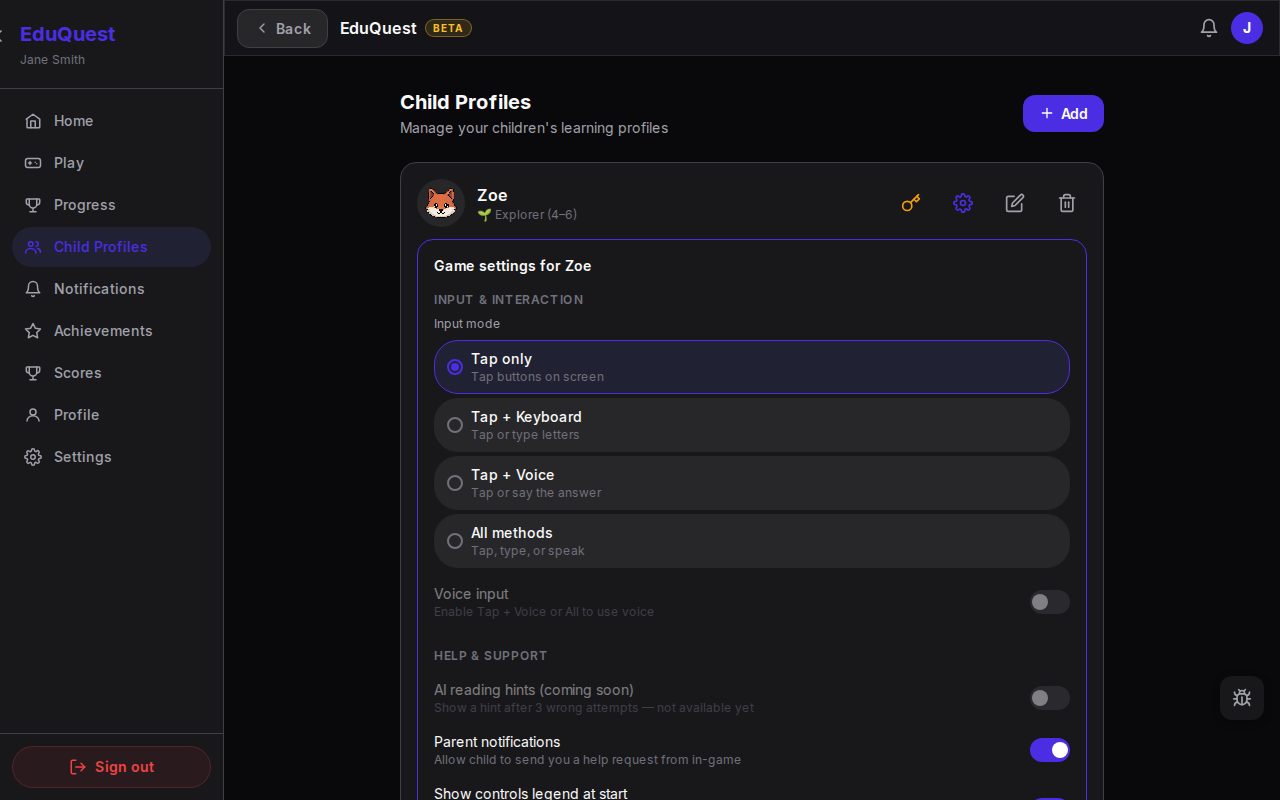 The game settings panel — input, help, appearance, reward games, difficulty and session limits, per child.
Mode: Explorer or Reader
This is the most impactful setting. It determines what kind of challenges your child sees.
Explorer: Letter recognition. Challenges show a single letter with a few options to choose between, and the game says the letter aloud when your child gets it right. This mode is for children who are still learning letter shapes and sounds.
Reader: Sight words and CVC words (like cat, dog, sun). Challenges show a whole word with a few options, and the game says the word aloud when your child gets it right. This mode is for children who know their letters and are building word recognition and fluency.
Our recommendation: If your child knows some letters but not all of them, start with Explorer. The confidence they build here transfers directly when they move up to Reader. If they can already name most letters, jump straight to Reader — otherwise Explorer will feel too easy and they'll lose interest. You can switch anytime, so it's an easy call to revisit.
Input Methods
WordQuest supports multiple ways for your child to interact with challenges.
Tap only (default): Your child taps the answer on screen. This is the simplest method and works well at any stage, especially on tablets.
Tap + Keyboard: Adds the option to type letter answers using a keyboard. Useful for children who are learning to type, or for desktop play.
Tap + Voice: Enables voice input so your child can speak their answer. This requires microphone permission on your device. Great for reinforcing the connection between seeing a letter and knowing its sound.
All methods: Enables everything. The child can tap, type, or speak — whatever feels natural in the moment.
Our recommendation: Start with tap only. It's the lowest-friction option and works for everyone. Add voice once your child is comfortable with the game — hearing them say letters out loud is a wonderful indicator of what they've actually learned. Save keyboard for when they're ready to start typing.
Help and Support
AI Reading Hints (coming soon): A feature we're finishing now — you'll see it marked "coming soon" in settings until it lands. Once it's live, the game will show a gentle hint after your child gets three wrong attempts on the same challenge: a warm, child-friendly nudge — not the answer, but a clue that helps them get there. It'll be great for independent play when you're not sitting alongside them.
Parent Notifications: Your child can send a help request from within the game. You'll receive a notification on your parent dashboard. This is useful for children who play independently but want the option to call for help when they're stuck.
Our recommendation: Once AI hints arrive, enable them for solo play — they'll prevent frustration loops where a child gets stuck on the same challenge and gives up. Keep them off for co-play sessions, where you can provide the hints yourself and make it a shared moment. Until then, your child can tap Lumie, the in-game guide, for a word of encouragement.
Difficulty
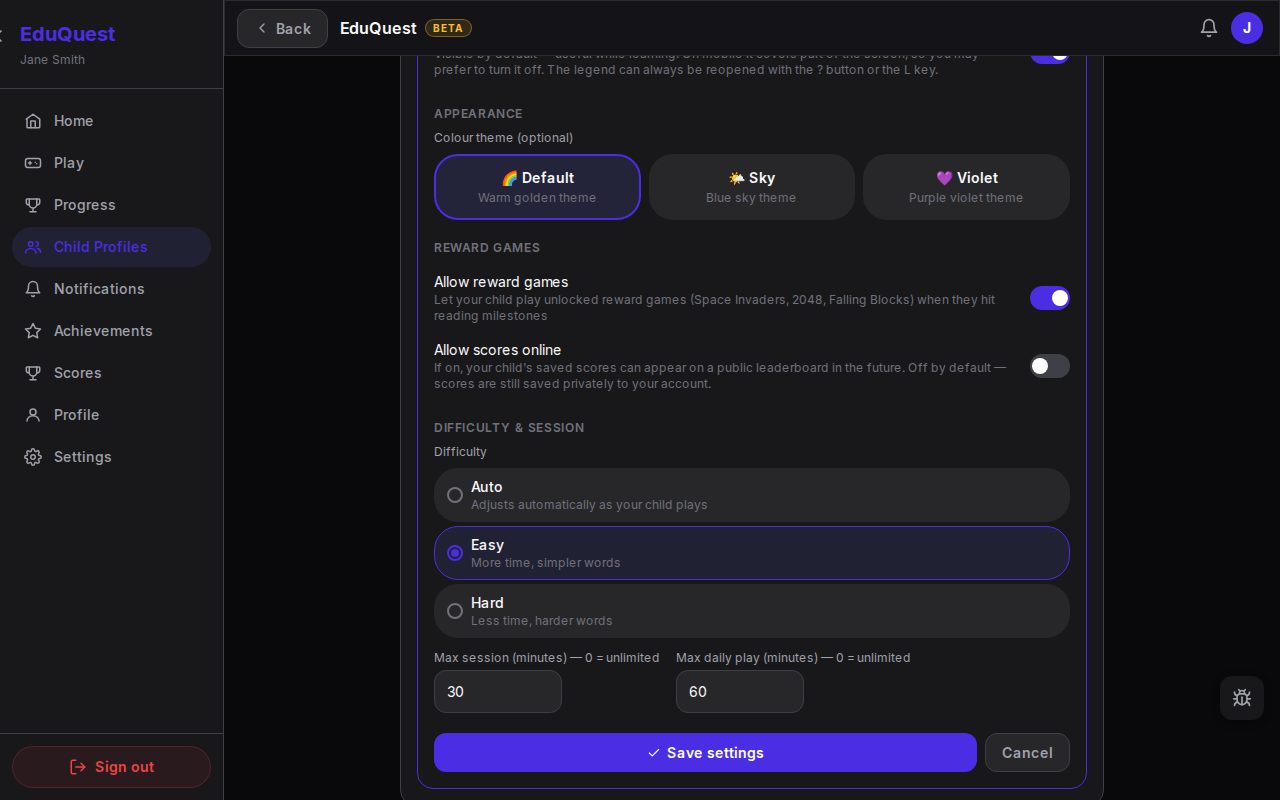 The Difficulty & Session section — difficulty plus the two play-time limits (0 = unlimited).
Auto: The game adjusts difficulty automatically as your child plays, based on how their recent answers are going. Sailing through? It gently steps up. Struggling? It eases off.
Easy: Simpler challenges and more support, to ease your child in gently. Good for children who are just starting out or who need a confidence boost.
Hard: Harder challenges and less scaffolding. For children who are breezing through and need more of a push.
The default: A new profile starts pinned to a fixed difficulty based on the starting level you picked — Easy for Explorer, Hard for Reader — so the first sessions are predictable. Switch to Auto when you're happy to let the game adapt on its own.
Our recommendation: Move to Auto once your child has settled in, unless you notice a pattern. If your child's accuracy is consistently below 50% (check the parent dashboard), switch to Easy for a while. If accuracy is above 90% and they're finishing levels quickly, try Hard. The goal is the sweet spot where they're challenged but not frustrated — getting roughly 7 out of 10 right. (Our parent-dashboard guide explains exactly where to find the accuracy number and what each metric actually means.)
Session Timer
Two limits sit alongside the difficulty setting, both in minutes:
Max session caps a single sitting — when it runs out, the game pauses with a friendly message suggesting it's time for a break. New profiles start at 30 minutes.
Max daily play caps the total across the whole day, however many sittings that takes. New profiles start at 60 minutes.
Set either to 0 for unlimited.
Our recommendation: When your child is new to the game, a 15-minute session timer is a good fit — not because longer sessions are harmful, but because newer players benefit from frequent breaks and often don't self-regulate screen time well. As their focus grows, 20–25 minutes is a good length. If they're deeply engaged and close to finishing a level when the timer hits, it's fine to extend — the timer is a guideline, not a hard cutoff.
Appearance
Color theme: Choose the visual theme for your child's game interface. Options include a default golden theme, a blue theme, and a purple/pink theme. This is purely cosmetic and has no effect on gameplay. Let your child pick — it gives them a sense of ownership over their experience.
Quick Recommendations by Stage
These are starting points, not rules — pick the one that sounds most like your child today.
Just starting out — still learning letter shapes and sounds
- Mode: Explorer · Input: Tap only · Difficulty: Easy or Auto · Timer: 10–15 min · Hints: On
Knows most letters — names letters confidently, not yet reading words
- Mode: Explorer · Input: Tap only · Difficulty: Auto · Timer: 15–20 min · Hints: On
Reading first words — starting on sight words and simple words
- Mode: Reader · Input: Tap (+ Voice) · Difficulty: Auto · Timer: ~20 min · Hints: On for solo play, off for co-play
A confident reader — reading words comfortably and wanting more
- Mode: Reader · Input: Tap + Voice, or All · Difficulty: Auto or Hard · Timer: 20–25 min · Hints: Off (let them try first)
Every child is different. If your child is crushing Explorer on Auto difficulty, bump them up. If they find Reader frustrating, there's no shame in switching to Easy for a week until their confidence catches up.
The settings exist to make the game fit your child, not the other way around. (Once you've got the settings dialled in, our ten tips for getting more out of WordQuest covers what to do during sessions to make them stick.)
WordQuest gives parents real control over their child's learning experience — because you know your child better than any algorithm. Set up your child's profile and customize it in minutes. Or browse the rest of our guides for parents first.