Setting Up Child Profiles (and Letting Your Kid Log In on Their Own)
Most of the trouble with "kids' apps that need a parent account" lives in the moment when the kid wants to use the app and the parent isn't there. They type the parent's email, they get the password wrong, they get locked out, the iPad goes back on the shelf. We built EduQuest's child-login flow specifically to avoid that — your child can sign in to their own profile with a PIN, no email, no password manager, no "Mum, can you unlock it?" five times a day.
This is the walk-through.
Part 1: Add a Child Profile (Parent Side)
You're already signed in to your parent account at this point. From the navigation, head to Child Profiles.
You'll see your existing profiles, if any, and a button to add a new one. Click + Add.
A short form appears with four things to set:
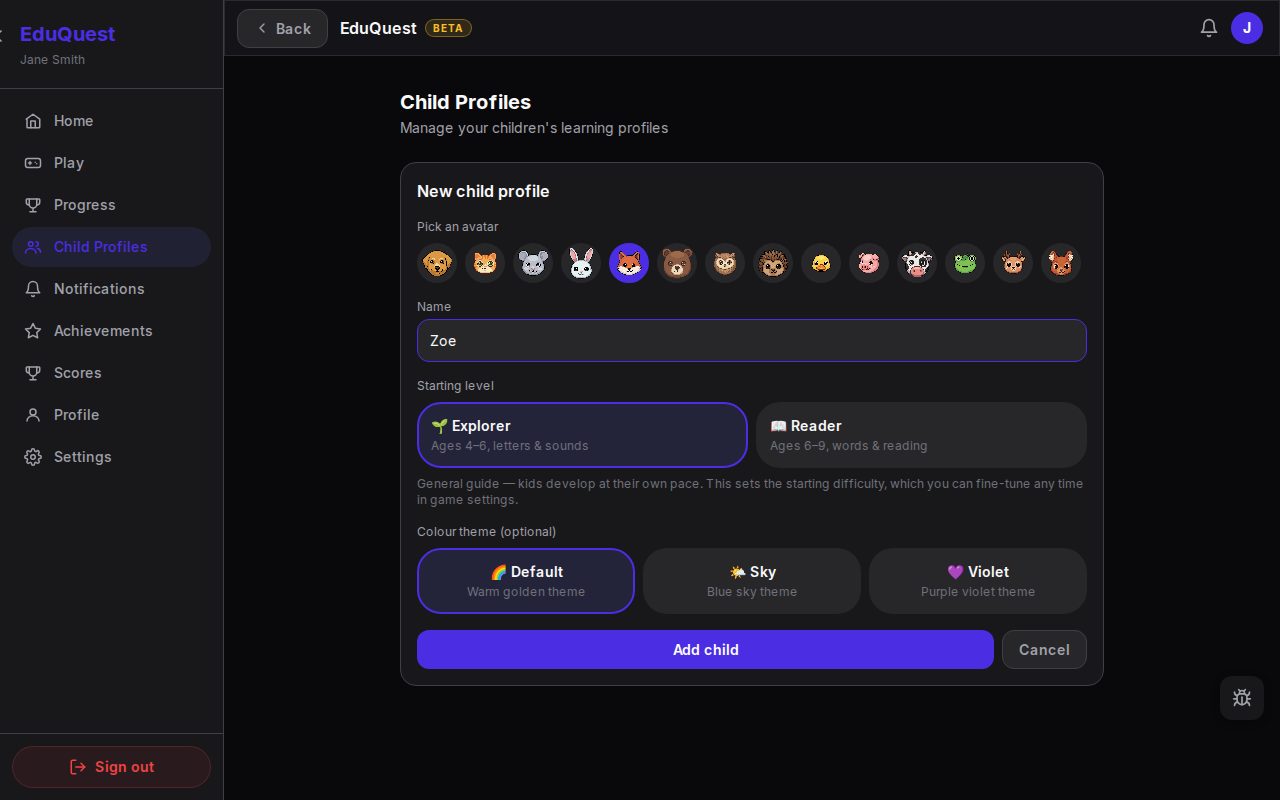 The New child profile form — avatar, name, starting level, and an optional colour theme.
Avatar
Tap one of the animal avatars. This is what your kid will see on their login screen and at the top of the game — it makes the profile feel like theirs from the first second. Pick something they'll recognise. (You can change it later from the settings if they decide a different one suits them better, which they will.)
Name (or nickname)
Whatever you call your kid — first name or nickname. No legal name needed, no last names, no age, no anything else. This shows on the parent dashboard so you can tell profiles apart, and at the top of their game screen as a greeting. We don't share it anywhere, ever, so a household nickname works perfectly — it's just for them and you.
Starting level
Two options:
- Explorer — letter recognition. Single letters, A through Z. The game asks "tap the B" and shows a few options to choose between. Built for the pre-reading stage.
- Reader — sight words and CVC words. Words like "the," "cat," "sun." The game shows a few options and ramps up as they get comfortable.
Mode is about reading stage, not age. Kids develop reading at wildly different paces — a child who's been read to since birth might be ready for Reader early; another who's only just clicking with letters belongs in Explorer for a while. When you're unsure, match the mode to what your child can already do, not to a birthday.
A few practical notes:
- What this setting actually does: it picks the starting difficulty of the game — Explorer begins gentler with fewer answer options, Reader a step up. You don't see any numbers; the game just shows the options. It's the starting point for "where does my child begin."
- The game adapts automatically as they play. If they're sailing through Explorer, the game starts presenting more options. If they're struggling in Reader, it eases up. This happens silently in the background based on the last 20 attempts. You don't need to manage it.
- You can override it anytime from Settings (the gear icon on a child's card). The override forces a specific difficulty regardless of what the adaptive system thinks. Useful if you want to lock things easier for a child who's frustrated, or harder for one who's bored.
If you're genuinely unsure, pick Explorer. Best case, they breeze through and the game promotes them automatically (or you flip them to Reader from settings). Worst case, they enjoy the wins and build confidence before the harder material arrives. Starting too hard and watching them struggle is the failure mode you want to avoid — it's how kids decide they "don't like reading."
Colour theme
Optional. Two options (sky, violet) plus a default. It tints the game UI to a colour your kid picked, which sounds trivial but is the kind of detail kids care about disproportionately. Leave it on default if you don't want to bother — you can change it later.
Save
Click Add child. The profile is created instantly and you'll see it appear in the list, with its game-settings panel opened so you can fine-tune things right away (or just close it — the defaults are sensible).
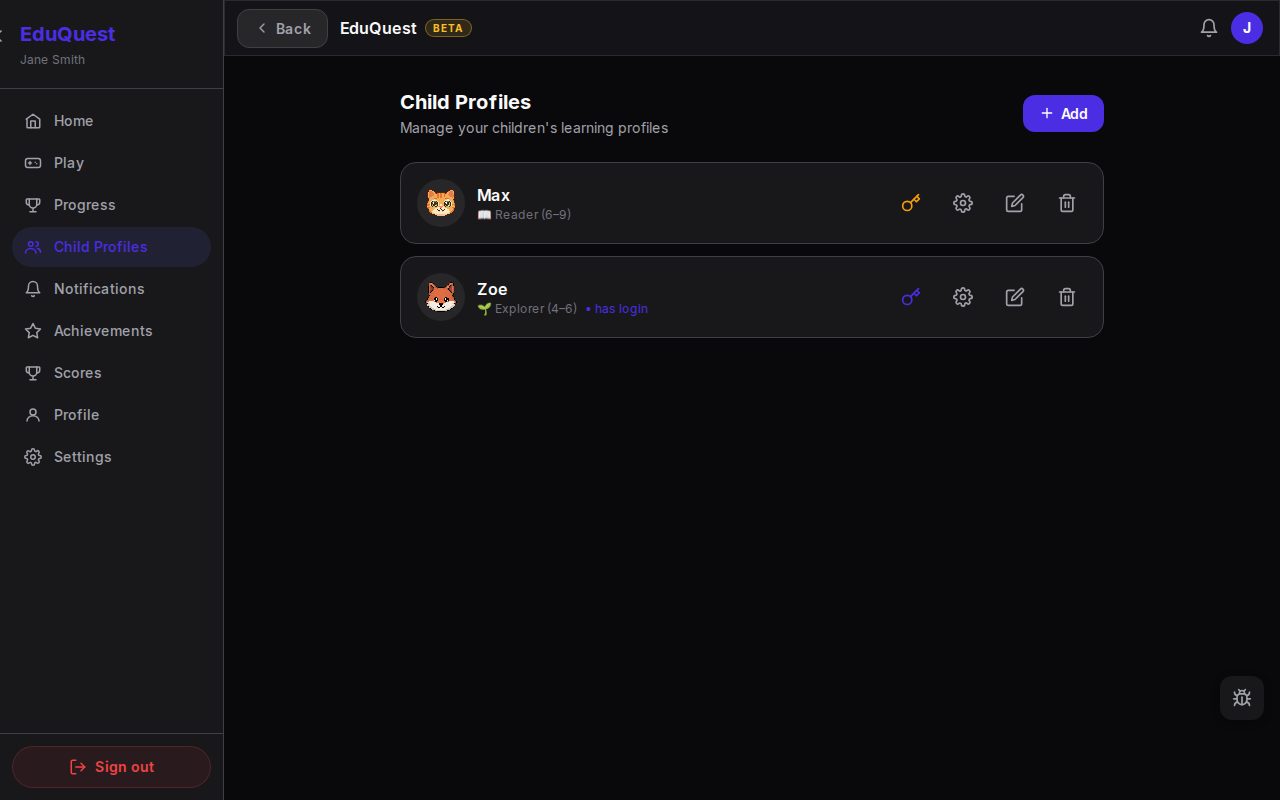 Two profiles added — the key, gear, pencil and bin icons sit on each card; Zoe's "has login" badge means her PIN is active.
You can repeat this for siblings. Each child has their own profile, their own progress, their own settings.
Part 2: Set Up Independent Login (The PIN)
This is the bit most parents miss because the button is small. From the child profile card, look for the key icon (🔑) — it sits first in the row of icons, before the gear (settings), pencil (edit), and bin. That's the activation button for independent login.
Click the key icon. A panel opens with a PIN form.
Pick a 4-to-8 digit PIN your child can remember. Important: this PIN is for your child, not for you. If they're four, pick something they already know like the year they were born or the number of letters in their name. If they're seven, let them pick it themselves — they'll be more likely to remember.
A few rules I'd suggest after watching my own kids forget PINs five times:
- Keep it short. Four digits is enough at this age. Eight is overkill and they'll forget.
- No birthdays of anyone who shares the device — if all three of your kids use the same iPad and one of them sets their birthday as the PIN, the other two will figure it out within a week.
- Avoid sequences (1234, 0000, 1111) — not for security reasons, but because the muscle memory is identical between siblings and they'll log into each other's profiles by accident.
Type the PIN once, confirm it in the second field, hit Activate login. Done — the profile card now shows a small "has login" badge.
Click the key icon again and the panel now shows two buttons — Show QR code and Copy link — with a change-PIN form below.
"Copy link" — the direct way
Click Copy link and the child's unique login URL goes onto your clipboard. It looks like:
https://playeduquest.app/child-login?id=<long-id>
This URL is specific to this child only — anyone who opens it lands on this child's login screen (just the avatar, name, and PIN prompt — no parent stuff visible). Email or text the URL to yourself, then on your kid's device:
- Open it in Safari/Chrome
- Bookmark it, OR
- "Add to Home Screen" so it becomes a tappable icon
That last one is what we do — looks like a real app icon, opens straight to your kid's login screen with one tap. No URL bar, no "type the address," no confusion.
"Show QR code" — the camera-friendly way
Click Show QR code and the panel reveals a QR code that encodes the same URL.
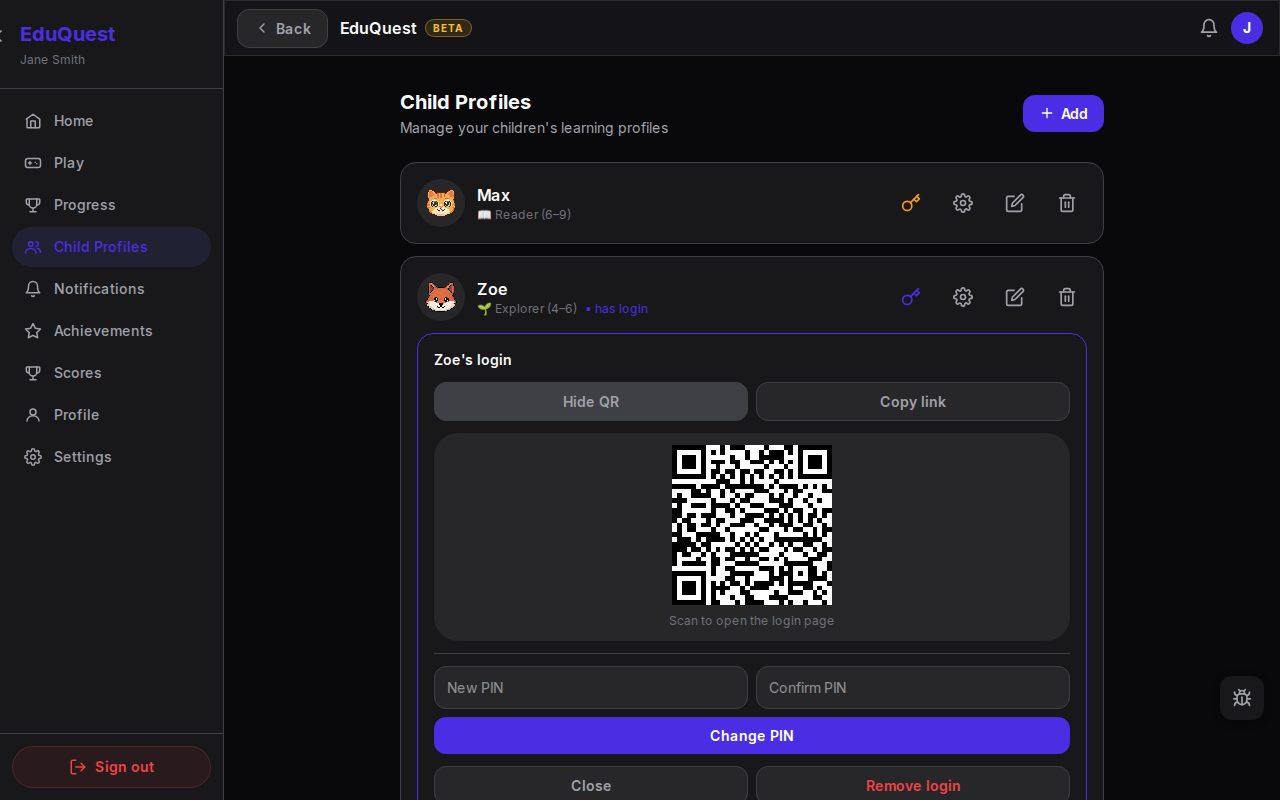 The login panel with the QR code expanded — scan it, or use Copy link; the change-PIN form sits below.
Hand your phone to your kid (or print the QR), let them point the camera at it, and the URL opens automatically on whatever device scanned it. Works great for kids old enough to handle the gesture, and feels more "magical" than typing a URL.
You can do both — copy the link AND show the QR — depending on which device the kid is going to use.
Change-PIN form
Below the buttons, you'll find a small form to change the PIN. If your kid blurts the current PIN to a friend, or you set it to something they can't remember, change it here. The login URL (and QR code) stays the same — same address, just new PIN to enter.
Part 3: Your Child Logs In
This is the part you'll do once with them, then they'll do alone forever.
They open the URL (from QR or bookmark or home-screen icon). They land on:
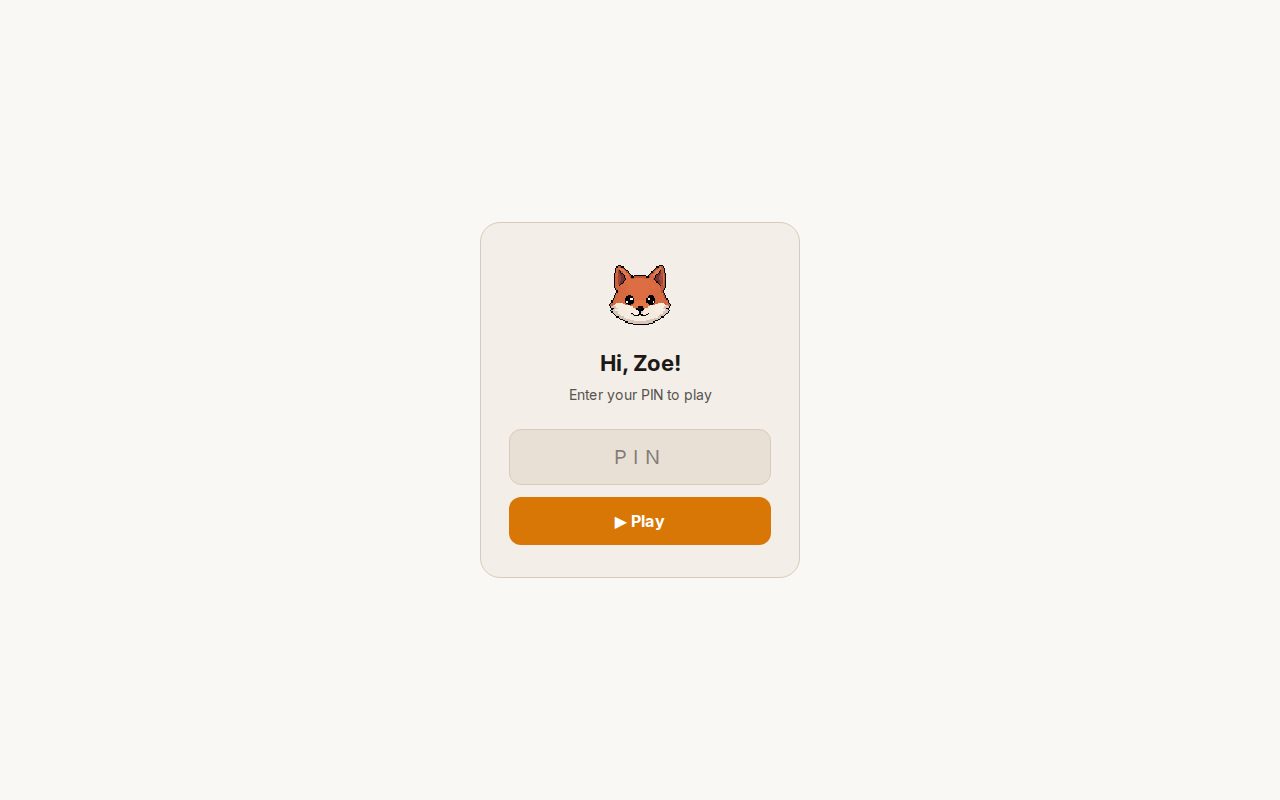 The child login screen — avatar, a hello, a PIN box, and a Play button. Nothing else.
Their avatar at the top. A friendly "Hi, [their name]!" Below that, a single PIN field with a "Play" button. That's the entire screen. No menus, no parent stuff, nothing to get lost in.
They type their PIN (with the on-screen numeric keyboard on tablet/phone, or the regular keyboard on a laptop) and tap Play. They land in the game. Done.
If they get the PIN wrong, the field shows "Wrong PIN. Try again." in plain language and resets. No lockouts, no "contact administrator," no scary error messages — at this age, scary errors create avoidance and you don't want avoidance around their reading app.
A Few Things Worth Knowing
- They can't accidentally hit the parent area. The child login flow signs them in to a separate session that's restricted to the game and their progress page. They literally cannot navigate to billing, settings, or anyone else's profile.
- The PIN is the only way in. No email recovery, no password reset. If your child forgets the PIN, you reset it from your parent dashboard in 10 seconds. There's no support ticket or recovery flow because there can't be — kids don't have email addresses.
- You can disable a profile temporarily. From your parent dashboard, you can clear a child's PIN (effectively pausing their independent access until you set a new one). Useful if you want them to take a break from screens for a few days without deleting their progress.
- Multiple kids on one device works fine. Each kid's QR code is different. You can have one tablet shared between siblings — each opens their own bookmark, types their own PIN, plays their own profile. Progress doesn't cross over.
What If Something Goes Wrong
A few real things that have happened in our house:
My kid forgot the PIN. Parent dashboard → key icon next to their profile → set a new PIN. Tell the kid. Done. 10 seconds.
My kid logged into the wrong profile and saw their sibling's progress. Currently this doesn't happen unless they have the wrong sibling's PIN — each QR/URL is profile-specific. But if it does come up, we'll surface a profile picker on the login screen in a future update.
The PIN field isn't appearing on my kid's iPad. Refresh the page. If still nothing, check the URL — the id= parameter at the end is required. If it's missing, you've got a malformed bookmark; rescan the QR.
My kid uses voice-to-text and is trying to "say" the PIN. Speech-to-text doesn't work in PIN fields (we set inputMode="numeric" precisely so the on-screen keyboard switches to numbers only). They need to tap the digits. Worth showing them once.
Setting Up Child Profiles — Summary
That's the whole thing:
- Parent → Children → Add child → name, avatar, age mode, theme → save
- Click the key icon on their card → set a 4–8 digit PIN → save → bookmark/scan the QR
- Child opens their URL → enters PIN → plays
The reason we built it this way is simple: every other "child profile" system I've seen makes the kid go through the parent's account or some chunky multi-step thing involving a phone number or an email link. For a young child, that's a deal-breaker. The whole point of giving them a profile is letting them get into it without you. PIN + QR code is the smallest thing that does that.
EduQuest's Misty Isle is free for everyone on your account, with a profile for each child in the family. No ads in the game, no behavioural tracking on children, parent dashboard so you always know what they're learning. Make a parent account and set up profiles in under five minutes.